


The floor is the home’s largest surface, and the best form of flooring for your room is determined by your budget, lifestyle, and personal preferences.
Each style has its own set of advantages, and deciding which is better depends on the needs and location of each room.
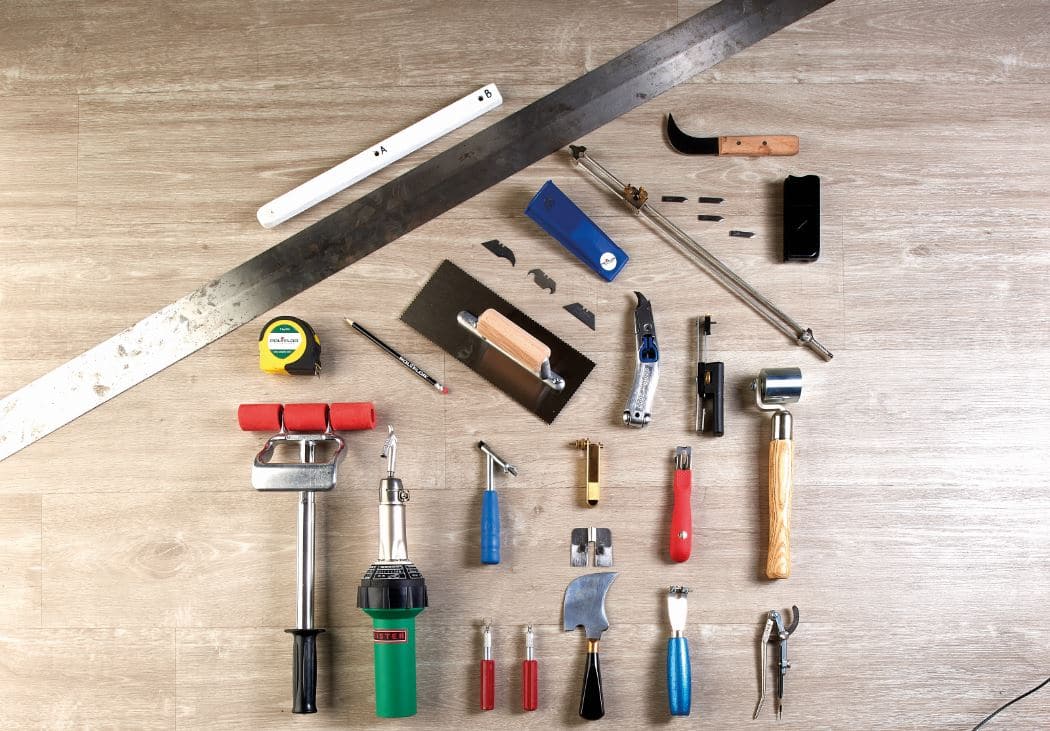
The tools required for installing flooring depend on the type of floors.
As we all know, there are different flooring types, and they all have their own pros and cons.
Types of flooring
There are different types of flooring such as:
- Hardwood flooring
- Carpet flooring
- Vinyl flooring
- Tiles
- Engineered wood flooring
- Stone flooring
- Marble flooring
- Linoleum flooring
Tools You Need to Install Your Flooring
DIY projects can quickly devolve into disasters if you don’t have the right equipment, and installing your own flooring is no exception.
Flooring construction will go much more smoothly with the right tools and supplies, and you’ll be able to prevent the weekend job from turning into a week-long project.
To ensure a good-looking and long-lasting result, proper flooring prep must be performed before any floor is built. Getting rid of the old flooring, whatever it was, is a vital part of the planning process.
Whether carpeting, linoleum, or something else, get the lumps, bumps, adhesive, tack strips, etc., up and smooth before you start to lay anything.
This includes fixing floor creaks (often loose floorboard nails) and ensuring that your subfloor is level.
Cracks and divots must be repaired, lumps removed, and other issues must be addressed in slab-built houses. Baseboard and/or shoe molding are sometimes used to give new flooring a finished look.
Preparation equipment and baseboard/shoe molding tools are not included in the list.
Tools Needed by Flooring
You’ll need a few tools for every flooring installation, but some need more than others. We’ll go over the flooring tools you’ll need for laminate, vinyl, engineered, and solid hardwood installations in this post.
In addition, if your subfloor requires repair, you may need additional tools and supplies. To ensure a smooth installation, be prepared before you begin your project!
Regardless of the type of flooring you’re installing, you should always wear appropriate safety equipment, such as safety glasses, gloves, and knee pads for comfort.
Underlayment Tools
An underlayment installation doesn’t require any fancy tools or equipment. Listed below are basic tools required:
- Scissors or a Utility Knife
- Tape
- Broom & Dust Pan
Laminate Tools
You’ll need some power tools to complete a laminate flooring installation. Cutting the laminate will necessitate the use of a saw, especially if there are any special edges or obstructions.
To assist with the installation, we recommend purchasing a laminate installation kit.
- Hammer
- Tape (You can improvise with packaging tape)
- Safety Glasses or Goggles to protect your eyes from residues
- A Dust Mask
- Scissors
- Measuring Tape
- Carpenter’s Square
- Broom & Dustpan
- Utility Knife
- A Saw. You can use a miter saw, a power jigsaw, a handsaw or a laminate specific cutter, a power saw with a dust collector, circular saw with a 60-tooth carbide-tipped blade.
- Hand Saw or Door Jam saw.
- Universal Installation Kit
- Spacer Blocks. You can use either plastic or wood ¼” thick.
- Tapping Block
- Pull Bar
Vinyl Tools
The type of vinyl flooring— glue-down, loose lay, or drop lock — can differentiate the installation tools. The following are the primary tools needed for a vinyl installation:
- Tape measure
- Utility Knife
- Medium-grit sandpaper
- Vacuum / Broom
- Face mask
- Carpenter’s level
- Seam treatments
- Double-faced flooring tape
- 100 lb. floor roller (loose lay & glue down)
- Flooring compound (Adhesive for glue-down application or stairs)
- Putty Knife
- Trowel
- Paint Stirrer
Engineered Hardwood Tools
Engineered hardwood floors may be glued down, bolted down, stapled down, or floated down. The nailing tools would be the same as they would be for solid hardwood.
Glue Down
- Industry-standard adhesive with moisture resistance
- 1/4˝ x 1/2˝ x 3/16˝ (6 mm x 13 mm x 8 mm) V-Notch trowel
- Concrete nails
- Broom and Dust Pan
- Dust Mask
- Saw
- Electric Saw
- Moisture Meter
- Blue adhesive painter’s tape
- Chalk line or chalk pencil
Float
- Eye and ear protection
- Glue (Wood-floor specific)
- Tape measure
- Moisture meter
- Broom
- Chalk Line
- Utility knife
- Wood chisel
- Painter’s Tape
- Pencil
- Pull bar and Tapping Block
- Straightedge
- Electric saw
- Hammer
Solid Hardwood Tools
DIYers shouldn’t undertake a solid hardwood installation. This type of flooring usually requires professional installation.
This is a comprehensive list of tools and supplies needed for a solid hardwood installation.
- Power Miter Saw
- Tenon, Circular, or Hand Saw
- Utility Knife
- Safety Gear, such as goggles and earplugs
- Power Nailer
- Claw Hammer and Nail Punch (specified by the flooring manufacturer)
- Measuring Tape
- Moisture Meter
- Chalk line and Chalk
- 15 lb Asphalt Paper and/or Vapor Barrier Film
- Level and Leveling Compound
- #20 Grit Sandpaper
- Straight Edge
- Rubber Mallet and Tapping Block
- Pry Bar
- Flooring Screws
- Filler Stick and Touch Up Marker
- Broom and Dust Pan
- Hardwood Flooring Nails
- Finishing Nails