
You might be planning on moving your blog or website to VPS now or later in the future. If you have used shared hosting before then you will be familiar with cpanel and you are thinking how are you going to manage your site?
Any FTP for file management? What about mail server for emails? You don’t need to worry about these things because they are already available, all you need to do is install Plesk on your Ubuntu, Centos VPS server.
If you are looking for a VPS provider I recommend Linode, Vultr, and DigitalOcean they are the major players in the market and also most popular.
Features of Plesk Control Panel
Below are some features of Plesk control panel;
Intuitive Interface
Plesk does not require the installation of multiple components to use its intuitive user interfaces. Plesk ships with one single component that provides role based access ? from the end user to the developer to the back-end admin, across all devices.
Solid Server Security
Making your applications and websites to function correctly without addressing the security needs of your infrastructure could have devastating consequences down the line. Plesk will handle that for you.
Server Automation
Rise to the challenges of managing today’s cloud-focused server infrastructure with the help of Plesk.
WordPress Toolkit:
You love WordPress like we do? If you love managing multiple WordPress instances, Plesk is perfect for you!
Webserver & Site Management
Webserver and sites under control. Plesk handles the rest for you, Apache with PHP FPM, Nginx with powerful caching, Litespeed Webserver SSL & FreeSSL Support (Let’s Encrypt), Scheduled Tasks , CDN Support by CloudFlare, Site Preview with dynamic sites and .htaccess protection support, Powerful Web Analytics with GeoIP Support (AWStats).
eMail Components
Plesk handles all your email server needs. And integrates with any webmail and almost any server.
How to Install Plesk Panel
So let’s get started on how to install Plesk on Ubuntu and Centos. Before we install Plesk, you need to set a FQDN (fully qualified domain name) or use a subdomain is more preferable. Create an A record with a name of your chosen for example plesk.mydomain.com or panel.domain.net, etc. here is an example using Cloudflare DNS manager.

From the above my Plesk backend will be accessed with the following URL panel.jodablog.com:8443.
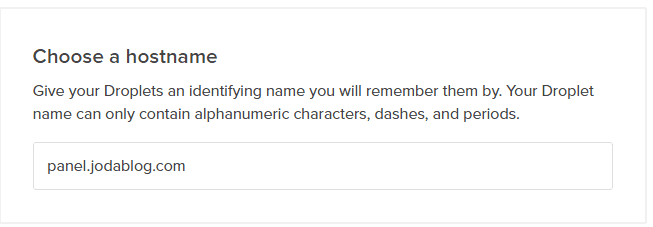
if you are going to use digitalocean, when creating your drop either with centos 7 or ubuntu 14.04, 12.04 make sure you configure your hostname like so, this will help you very well.
First of all if this is a new server, droplet, or linode then update all the necessary components and programs like so
apt-get update && apt-get upgrade -y
- Open /etc/hosts with the below command using terminal on Linux or Mac and putty on windows, download putty here.
nano /etc/hosts
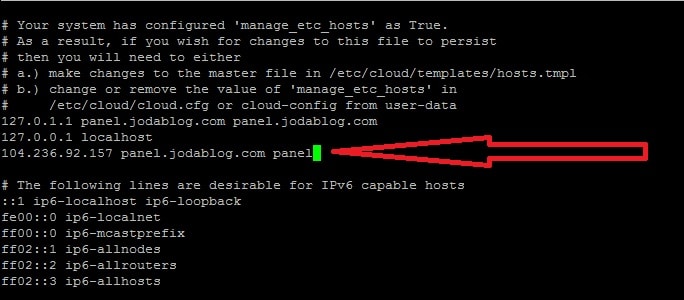
Go to the next line and add the hostname and IP to the /etc/hosts file which will enable you to access the backend of plesk control panel. Plesk requires this so be careful when doing it if not you won’t be able to access the backend. Do it like so
104.236.92.157 panel.jodablog.com panel
to save use CRTL + X then press Y (yes)
check the image below;
2. Open the hostname file /etc/hostname with the following command, the will show as the name you see once you login root@panel
nano /etc/hostname
add the following to that file like so
panel.jodablog.com
As usual hit CTRL + X then Y (yes). if you use digitalocean and then you configured the hostname i told you above then this is already set for you, for linode, vultr then you have to do this yourself once you are done reboot the server with the following command, so changes can take effect. type that on the command line either putty, mac or linux.
reboot
3. Apparmor is a security program on Ubuntu that interferes with plesk connection to bind9, you can remove it with the following command; or read this article on how i fix this issue
apt-get remove apparmor
4. Now get a cup of coffee as we are about to start, this process might take 15mins or more depending on your network and server power (i always go for the best 😀 ). type this or copy and paste it on putty, terminal. please make sure you are using root account or add sudo if you are not using the root account.
wget http://autoinstall.plesk.com/plesk-installer
chmod +x plesk-installer
./plesk-installer
if everything goes as plan with no error, then you should receive the below message with link on how to access the backend of your plesk panel.
Congratulations!
All stages of the installation/upgrade have been finished.
psa is now running on your system.
To complete the system configuration process, please proceed to URL:
https://panel.jodablog.com:8443/ or
https://127.0.1.1:8443/
Use ‘root’ and ‘<YOUR root PASSWORD>’ as login name and password in case of fresh installation.
Use ‘admin’ and ‘<YOUR admin PASSWORD>’ as login name and password in case of upgrade,
or if Plesk is already configured.Further, use the following commands to start and stop the system:
/etc/init.d/psa start and
/etc/init.d/psa stop respectively.
now you have successfully installed plesk on your server, you can now migrate your sites from cpanel, or manually ( i use this because i love stress 🙄 ). Let me know in the comment section if you face issues or problems installing plesk control panel.
I will be using this to share plesk tutorials for now.